
Hi friends! I hope you guys had an amazing weekend. I certainly did... soaked up the sun in our backyard, celebrated a dear friend's birthday, partied it up (virgin margarita style!) for Cinco de Mayo, had some showings at the house and really just enjoyed the last few days.
Remember a few months ago, when we all chatted about the demise of our beloved Picnik? Since then, I've been playing with different photo editing options. Per your awesome suggestions, I tried out lots of Adobe products, such as Lightroom and Photoshop Elements. While they're certainly amazing programs, they were a little too complicated for me. At least for right now.
But then I learned about the new, wannabe Picnik: PicMonkey. Once I started playing around in the program, I realized it was pretty good! It has most of the amazing features Picnik had along with a few more fun editing options and funky effects. Momma likes. The only thing is that they don't offer photo collages... yet. But I figured out a way around that!
Last week over on BabyCenter, I shared this tutorial I created for PicMonkey. It's all about how to create a photo collage and word art in the program. You could easily use PicMonkey to edit your blog photos, create art to decorate your house, design personalized greeting cards or even make a last minute Mother's Day gift! I love it, so many options.
I promised I would share which photo editing alternative I ended up choosing.
So without further ado... my PicMonkey tutorial!

Step uno. Save a blank page in Paint (or a similar program) and open up in PicMonkey.

Step two. Rotate and resize your blank page. I used a 5x7 for this tutorial.

Step three. Pick a font... or two! Don't be afraid to play around, they have so many cute options.

Step four. If you're creating word art, I suggest using a few cohesive fonts and colors to liven it up.

You can choose colors that are already on the page by clicking the rectangle shown and then clicking the object whose color you want to copy. So if I want the exact same color green in "mothers" for the line that says "children," I'd start typing children, click the rectangle, then click "mothers." Boom, the word "children" is the same color as "mothers."

Step five. Find a cute quote to type up! I found this one on Pinterest.

Step six. Add some fun "overlays" or clip art to your masterpiece. I faded mine to the back of the text for a more subtle approach.


Step seven. Add a border.

Step eight. Stand back and admire your fabulous word art! Feel free to print this one for personal use.

Now what if you want to add photos to your project?
Step one. Start off with a blank page, same as above.
Step two. Because there is no collage version available yet on PicMonkey, you add photos as an "overlay." Simply click on the overlay category and then choose "your own." You are given the option then to upload photos into the program! Jackpot.
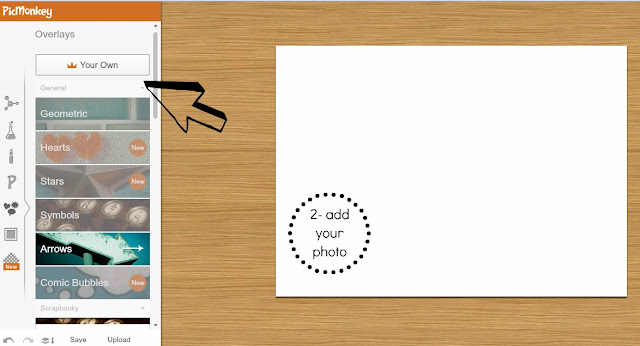

Step three. Simply add as many photos as you'd like! I just chose one for this project.


Step four. Then play with all of the fun features just like we did above... font, graphics, overlays, text, colors, borders, etc... the PicMonkey world is your oyster!

Step five. Love your new creation. I think these are so fun and easy!

I've also been using PicMonkey to create the collages for my weekly preggo bump pics.

It's so fun and easy to use, I just had to share.

So, whatcha think? Are you a PicMonkey fan like me?


